Delegating Control
Obviously, one of the
simplest ways to minimize your administrative chores is to delegate
them. In a Windows NT network, the usual way to grant broad
administrative rights was to make users members of the Domain Admins
group. You could also parcel out administrative rights through some
combination of other groups such as Print Operators or Server Operators.
These groups are
still available, but Windows Server 2003 makes delegation even simpler,
allowing you to assign responsibility for management of some portion of
the namespace to another user or group. The recipient of the delegated
authority can have complete administrative control within the area
chosen but not the sweeping administrative rights inherent in being a
member of the Domain Admins group.
Assign control
by organizational unit (OU) whenever possible, because assigning
permissions at the object level quickly becomes too complicated to be
worthwhile. Records of security assignments are critical, so keep track
of all delegations. To delegate control, use the Delegation of Control
Wizard, which always assigns permissions at the OU level. To use the wizard, follow these steps:
1. | Launch Active Directory Users and Computers from the Administrative Tools folder.
|
2. | Expand
the domain node, right-click the container for which you want to
delegate control, and choose Delegate Control from the shortcut menu.
This starts the Delegation of Control Wizard. Click Next.
|
3. | Click
Add to select the user or group to be granted control. Make your
selection from the Select Users, Computers, Or Groups page.
|
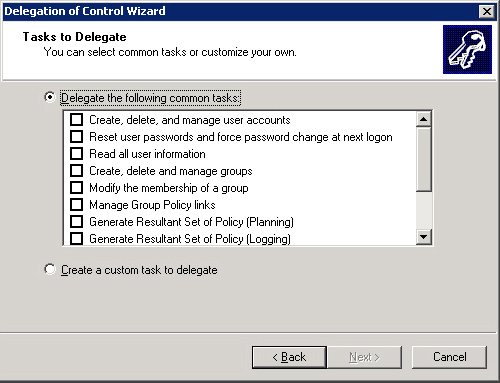
4. | In the Tasks To Delegate page, shown in Figure 1, select the tasks that you want to delegate. Select predefined tasks, or click Create A Custom Task To Delegate. Click Next.
|
5. | If you selected a predefined task, you’re essentially finished. Review the summary and click Finished.
|
If
you selected Create A Custom Task To Delegate, you’re presented with
more specific choices about what objects you’re delegating control on
and the specific permissions to be granted. When those choices are made,
you’ll see a summary of the delegation. Click Finished.
Using Task Scheduler
It’s true that you
could—and still can—schedule tasks using the AT command, but Task Scheduler provides a graphical interface
and is much easier to use. Tasks can be scheduled during off-hours to
run repeatedly. The Task Scheduler service is started at bootup and runs
in the background. To use Task Scheduler, open Control Panel,
double-click the Scheduled Tasks folder, and then follow these steps:
1. | In the Scheduled Tasks window, double-click the Add Scheduled Task entry. This starts the Scheduled Task Wizard. Click Next.
|
2. | Select a program from the page, or click Browse to locate another program. Click Next.
|
3. | Supply a name for the task, and then indicate how often you want it performed. Click Next.
|
4. | Select
the time of day you want the task performed. Depending on the timing
you’ve selected, you’ll also need to specify one of the following:
- Daily Task Every day, every n days, or weekdays only.
- Weekly Task Every n weeks; supply the day of the week.
- Monthly Task Select the day of the month, and select which months.
|
5. | Supply
the user name and password for the user who will be scheduling tasks.
Note that the account you specify must have the privileges necessary to
run the task. For example, if you’re scheduling a backup program, the
user must have backup rights. Click Next.
|
6. | If
you need to specify parameters for the task being scheduled, select the
Open Advanced Properties check box and then click Next.
|
7. | Make the necessary changes and click OK.
|
Important
For tasks to run as expected, it’s important that the computer’s date and time be set correctly.
Many programs will start
to run in Task Scheduler and then pause, waiting for input that never
comes—or input that comes much later, when someone looks at the machine
to see what’s going on. To make sure you have all the parameters for a
task to be able to run successfully, open a command prompt and type program_name /?.
Then right-click the task in the Scheduled Tasks window and choose
Properties from the shortcut menu. Enter the necessary parameters in the
Run text box and click OK.
You might want to
schedule a task to run right away so that you can test its performance.
If a task is scheduled by a user and that user isn’t logged on at the
scheduled time, the task still runs in the background and is not
visible.
Note
Unfortunately, the
Windows Server 2003 disk defragmenter utility doesn’t support scheduled
operation. To schedule a defrag operation, you can either purchase a
commercial defrag program that supports scheduling, such as Raxco’s
PerfectDisk, which runs on both 32-bit and x64 versions of Windows
Server 2003, or you can create a little batch file that runs the
command-line version (Defrag.exe) and use the Windows Task Scheduler to
run the batch file.
Changing a Schedule
Even the best schedule
can run up against reality now and again, so you need to be able to
adjust your planned events. Here are your options:
To run a task immediately, right-click the task’s icon in the Scheduled Tasks window and choose Run from the shortcut menu.
To
stop a task that’s running, right-click the task’s icon in the
Scheduled Tasks window and choose End Task. If the scheduled task has
been set up to start another task, the End Task command halts only the
original scheduled task.
To
temporarily halt all Task Scheduler actions, open the Advanced menu in
the Scheduled Tasks window and choose Pause Task Scheduler. Any tasks
that do not start because Task Scheduler is paused will run again only
at their next scheduled time. To start Task Scheduler again, click the
same menu and choose Continue Task Scheduler.
To
stop using Task Scheduler, open the Advanced menu in the Scheduled
Tasks window and choose Stop Using Task Scheduler. No scheduled tasks
will run, and the Task Scheduler service no longer starts automatically
when the system is rebooted.
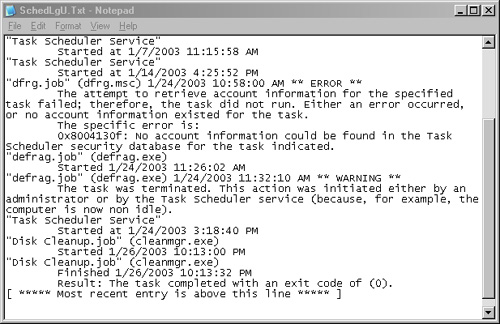
Tracking Task Scheduler
The system maintains a
detailed log of Task Scheduler’s activities. To view the log,
double-click Scheduled Tasks in Control Panel. From the Advanced menu,
choose View Log. This opens a log, like the one shown in Figure 2,
with the most recent entry at the bottom of the window. The Details
view in the Scheduled Tasks window displays information about each task.
If a scheduled task
doesn’t execute as expected, right-click that task in the Task Scheduler
window and choose Properties from the shortcut menu. Verify that the
task is in fact enabled. (The Enabled check box in the Task Properties
dialog box should be selected.)
Viewing Tasks on a Remote Computer
If
you are an administrator of a remote computer running Windows 2000
Server, Windows 2000 Professional, Windows XP Professional, Windows NT 4
Server, or Windows NT 4 Workstation, you can view and edit the Task
Scheduler settings on that computer. Find the computer in the My Network
Places window or in the Network Neighborhood window, right-click, and
select Explore from the shortcut menu. In the left pane, open Control
Panel and double-click Scheduled Tasks.
To view and edit scheduled tasks, the remote computer must meet the following requirements:
Have remote administration enabled
Specify your user account as having remote administrative access
Share the hard disk on which the Scheduled Tasks folder resides